Showing posts with label gifts. Show all posts

Friday, 1 November 2013

2013 Eco Holiday Gift Guide


  1. Enchantmints' wooden fairy forest lodge toy
  2. Organic & fair trade Holiday Spice Set (cloves, nutmeg & cinnamon) from The Spicy Gourmet
  3. Vegan lip tar and nail lacquer set from Obsessive Compulsive Cosmetics
  4. TOMS+ Grey Serpentine Desert wedges for women
  5. Mosey working girl bag (made from 35 plastic bottles)
Have you started your holiday shopping yet?


Friday, 17 May 2013

Organic Tip # 6: What's So Great About Organic Flowers?

What could be more organic than a pretty pink tulip, glistening with dew and growing out of the rich soil and into the sunlight, right?

Wrong!  Unless that delicate tulip came from your own garden, how do you really know how it's been treated?  Luckily there are now organic certifiers for plants.  Look for their logo and rest assured about the origin and treatment of your flowers.

5 GREAT things about organic flowers:
  1. Organic flowers are eco-friendly and has the least negative impact on the environment (when compared to conventionally grown flowers)
  2. Toxic chemical usage is minimized or eliminated.  That means no harsh and artificial pesticides, herbicides, fertilizers or other funky chemicals. 
  3. Organic flowers are good for the soil.  When you add harsh chemicals to soil, some of the nutrients are lost and the natural pH is thrown off balance.  Dry, lifeless sand does not grow nice looking flowers, so conventional farmers need to add more chemicals back into the soil to regain the nutrients that are lost.  This creates a cycle of growing that does not and cannot work long term. 
  4. Growing organic plants are safer for farmers and farm workers.  You know when you're looking at your garden (or lawn) and wondering how you can easily remove the weeds, without using chemicals that might be dangerous for your children and pets.  Well think about the people who do this for a living.  Do you want others to handle potentially harmful chemicals, exposing themselves to numerous health risks daily?
  5. Research consistently shows that organic farming is far better for the environment and more sustainable than conventional farming (food or flowers).  Organic growing methods honor the natural cycles of plants, harnesses the helpful assistance of insects, birds, water and the sun.     
And now for the age ol' question ... how will I know which flowers are organic?


Veriflora  is a third party sustainability certification program for fresh cut flowers and potted plants.  Their website outlines their main objective as: 
"Encouraging farming practices that build soil, conserve water and support healthy ecosystems.  Promoting a healthy, equitable workplace that supports farmers, workers, their families and the community.  Supporting handling practices from seed to store that allow you to enjoy flowers and plants that look beautiful and last longer."
On closer inspection I couldn't find the word organic anywhere, but instead a healthy plethora of sustainability instead (me thinks the lawyers are responsible for that one).  However Veriflora seems to be the front runner on organic cut flower certification, and it seems that they are doing a good job so far.  

Did you know that the trusty Fairtrade logo is popping up on flowers too?  And Fairtrade is not just about paying a fair wage, it's also about the health and safety of workers.  According to the Fairtrade Canada website, "a detailed set of safety regulations specific to flower production limit the use of agrochemicals and prohibit the use of banned pesticides."  Again no mention of our favourite word organic ... but we'll get there one day.  Baby steps.

Where do you get your cut flowers?


Friday, 26 April 2013

I Like His Style: Blake Mycoskie


It's been a while, but I finally found another person worthy of a feature in one of my style posts ...

Last year I came across hottie humanitarian, Blake Mycoskie's book and I gotta say ...

I like his style! 


While traveling in Argentina, Blake was shocked to see many children without shoes.  Not a stranger to business (he already had started several), he began to brainstorm ways to help.  Helping children in under developed countries is not exactly a novel idea, so Blake knew it had to be different while still keeping a connection to the idea's Argentinian roots.  When he realized there may be a market back home for the unique and simple shoes worn in Argentina, TOMS was born.  For each and every shoe purchased another shoe is given to a child in need, a philosophy Blake calls One for One.   

That was back in 2006, and oh how far has TOMS come now.  I remember seeing the black, red or dark blue shoes all over college/universities campuses.  But now I am seeing all kinds of fun patterns, sparkly glitters and even VEGAN styles (no leather!!)


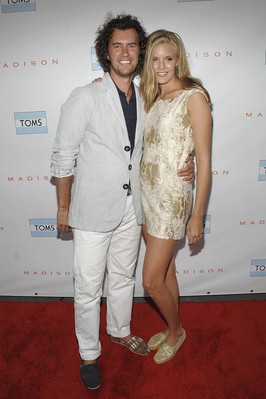
Of course Blake himself is frequently seen around town wearing his TOMS.  Wearing them both stylishly and cleverly, I think.  Wearing two different shoes to showcase two different styles.  Smart.

Actually I think his entire business concept is smart, and so do a lot of others.  Among TOMS' many other accomplishments, in 2011 Blake was named as one of the top entrepreneurs in Fortune Magazine's Top 40 Under 40 list.

How many products do we hear about or see where only a portion of the profits go to charity, or a measly $1 from a $40 bottle of shampoo goes to the endangered species of the month?  Too often.  What I like about TOMS (and so do others) is that when I buy a pair of shoes I know that the exact same shoe will be donated to someone who needs it (well ... actually I am not sure if he donates the sparkly glitter shoes, but you know what I mean).   


What I love even more about Blake is that he was photographed with my first style post muse, Lauren Bush, and they are each posing with their iconic style pieces.


I can see Blake Mycoskie's future and boy is it bright.  So bright he's going to need sunglasses.  Good thing TOMS has also started an eyewear line.


Tuesday, 26 March 2013

Green Springin'

Here are some of my favourite things for this spring (of course all with a little dash of eco-ness):


  1. Kids wooden rainbow puzzle from LivEco 
  2. Blooms reusable gift wrap (with soy-based ink) from chewing the cud 
  3. Daisy wristlet made from candy wrappers from Ecoist 
  4. The twister tank from eco-chic boutique Carrot Banana Peach 
  5. Camino fair trade, certified organic chocolate Easter bunnies

Wednesday, 13 June 2012

DIY #10: From Tank Top to Bag


Here's a super easy bag made from an old ill-fitting, but lovely Indian silk tank top.  All you'll need is a tank top and either a sewing machine or needle and thread.  Even if you are hand sewing, this project will take you no time!
  1. Turn the tank top inside out.  
  2. Lay the tank top lining up the side seams so the straps line up.  The straps now become the handles of your new bag. 
  3. Sew the bottom closed. 
  4. Turn right side out. 
Important Note:  Choose a tank top that has the same neckline as the back.  This tank top has a scoop neckline that is the same in the back, but some tanks have a scoop or v-neck in the front and a flat neckline in the back.  The latter will not work for the project.

My tank top had a slightly different pattern on the back, so when the side seams were lined up the front of the bag had a kind of mismatched look, but I think it's charming (plus since I didn't want to go out a buy a tank for this project, I couldn't exactly be too picky).  If you're concerned about this, make sure you use a top with a matching pattern both back & front.

This top is from a Canadian company that I absolutely love, Alchemy.  The owner sources the materials and labour from India, paying local women a fair wage and then shipping back to Canada for sale. 


I love that I can support both my countries by buying Alchemy merchandise.  Reading the story of the owner, Trish, who is also a yoga teacher, describe how she fell in love with India which resulted in her repeated travels back and forth from Canada is a bit reminiscent of my own story.

I absolutely love that in less than 10 minutes after being a tank top I was already using my new favourite bag.  I stuffed one of my favourite books in there ...

Autobiography of a Yogi by Paramahansa Yogananda

Happy craftin'


Tuesday, 16 August 2011

Travel Sewing Kit UPDATE

I know you've all been kept up at night wondering how I decorated the cover of my travel sewing kit that I made a few months ago for my trip to India.  So here is the final reveal:


I had an afternoon off from teaching, so I grabbed my sewing kit, a needle and some embroidery thread, and headed for my favourite mango tree (it was my favourite because there were 2 hammocks hanging there).  Darn I should have taken a picture of it!


First I started embroidering the lettering.  I used a straight stitch with gaps to give it that sewing kind of look.  I brought a lot of embroidery thread with me on that trip, but unfortunately this was the only embroidery I did.  Not enough hours in the day ...

But I didn't want to just leave it plain like that.  So I used a pattern from Bugs and Fishes' book Super-cute Felt for the spool of thread (tons of cute felt projects in there by the way).


All that embroidering left quite a mess of stitches and knots on the back of the cover.  So I decided to use a bit more felt to cover it all up.  I used this piece of felt with a heart attached.  The heart encases my favourite sewing needle (yes, I have favourites).


Then I added some co-ordinating ribbon to each flap to keep my kit closed.

If you missed my tutorial on how to make your own sewing kit, check it out here.


It's much easier to make than you may think, and allows you to have all your crafty supplies with you when you travel.  I'm sure glad that I had this kit with me because shortly after arriving at the airport the zipper pull came off my carry on bag.  It just zzzzzzzzzzipped right off the end of the zipper.  I used the big safety pin in this kit to secure the end of the zipper, so it wouldn't fall off for the rest of my 30+ hour journey to India (layover in Abu Dhabi).


This would make a cute gift too for that world traveller in your life.

Wednesday, 10 August 2011

5 Pinteresting Links

Are you on Pinterest?  It's a cyber cornucopia of craft ideas, eco inspiration and beautifully shot photography.  It's also incredibly addictive, more so than Facebook I'd say. 

Anyhow you can judge for yourself.  Here are some of my favourite things I've seen on Pinterest lately:


When I was growing up we used to have dozens of these wooden spools in our backyard.  I love this idea of bringing them inside to use as a side table/book storage.  All you need are a few strategically placed dowels, wheels and a coat of paint.


These are just adorable and seem so simple to make.  I think my favourite part of this craft will be hunting for the stones.  I'm going to walk down to the lake as soon as I hit 'publish' on this post.


Must try this tonight ...


Raw vegan ice cream bars, need I say more?


This pin reminded me of a fellow yoga teacher I met last summer.  Before he went back home to New Zealand he told me he had to give me is business card.  Wow, I thought, he has a business card?  He reached into his pocket and pulled out a torn piece of cardboard with his name and email address written on it!  This stamp makes his idea so much more classy.

Honestly I could find 10+ things on this site everyday that interests me.  Genius!.  Are you on Pinterest?


Wednesday, 27 July 2011

Chinatown Chic Refashion

Here's my current situation: I have a cute pink chinois top that I don't really wear anymore (it's backless ... a relic from my previous life where I went out to lots of parties).


... AND a bamboo handle purse in a pattern I hate.


Hmmmm ...

Hey, why don't I combine the two to make a cute Chinese-style bamboo handled purse?  Well that's exactly what I did.


The whole thing was super easy and took me probably no longer than 30 minutes.  First I removed the collar from the top.  I love the Chinese style button.  I have to think of something fun to do with it.


Then I cut off the two long straps on each side.  The fabric comes to a point here where the straps were attached.  I decided to use these points for attaching the handles.  With right sides together, I folded the fabric into a rectangular shape and stitched the sides together leaving the pointed ends open.


Then I turned right sides out.  Folded each of the pointed ends over a bamboo handle and hand stitched them to secure.


Super easy, uber chic and 100% recycled/reused materials.  I love it!


I would love to do this with some old sari material and the square wooden handles they use in South India.  Future project for sure.  But for now I'm happy with my Chinese-Bamboo bag.


Happy re-fashioning!

Saturday, 18 June 2011

Get Crafty For Charity


I wanted to have this post published a few weeks ago, so anyone interested could also donate a bracelet to the charity, but I've still been having problems with Blogger.  Since I've been away, there was quite a few changes to the way posts are created and how to insert pictures.  But I think I have gotten the hang of it now, so look out for lots of new posts from now on :)

For quite a while now I have wanted to create something for Craft Hope.  This crafty website combines handmade items and helping others in need.  The idea is to gather as many handmade items and then the website distributes them to different charities and non-profit organizations.  The first project sent pillowcase dresses to impoverished children in Brazil.  Another project made sock monkeys for child burn victims in California.

Project 12 is making friendship bracelets for an orphanage in Russia.  For a long time I have wanted to donate something, but I either missed the deadline, didn't have the time or the project was something I've never made (project 5 was quilts).  When I saw this friendship bracelet, I knew it had to do it!

The bracelet is easy (and of course) environmentally friendly.  I used an old shirt and ribbon remnants.  Here's what I did:

I have a shirt in a pretty colour that didn't fit right anymore ...

    
So I cut it up!  Into 3 long strips.


And then braided them ...


Then using a sewing machine I stitched the ends together (you could probably do this by hand as well).  Trim away the excess fabric.  To make sure the ends don't fray I used a little bit of fabric glue.  Now you should have a long braided loop (kinda like a necklace).  Wrap it around your wrist a few times.  The number of wraps will depend on how long your loop is and how big your wrists are.


I have freakishly small wrists, so I made this bracelet to fit me because I know it will also fit children at that size.

Now you just need something to cover the seam.  I used a small piece of leftover ribbon I had in a matching colour.  A contrasting colour would also look nice.  Or you could use a big decorative button and hand sew it on. 

Wrap the ribbon (right sides facing) around the bracelet over the seam.  Stitch, trim ends and then turn right side out.


Easy peasy, right?  I'm really happy with how it turned out.


I mailed it out to Craft Hope the next day.  In a recycled paper box of course.


I hope this bracelet brings a smile to the child in Russia who receives it.

Have you ever participated in a Craft Hope project?  If not, make something today!  The deadline for this project has already passed.  But the next project (security blankets for tornado survivors) is in full swing. 


Sunday, 12 December 2010

Gluten-Free Gift Ideas

Here's a great gift for the holidays for that gluten avoider in your life. I made this last year for my sister-in-law who avoids gluten like Superman & cryptonite :)

First find a great gluten-free recipe. I used a recipe for a baked macaroni & "cheese" from the Gluten Free Goddess blog (lots of great recipes there). Find something that suites the recipient. Type up the recipe and print it out on fun paper or a cute recipe card.

Collect a few ingredients from the recipe and assemble them together in a baking dish or something relevant to the recipe (use a cake pan for a cake recipe, a salad bowl for a salad recipe ... you get the idea).


It's actually quite fun to hunt for things. I found this gluten-free mustard in my local health food store. I don't know if regular mustard has gluten in it, but this one sure doesn't! I also added a few other cooking related things (there's some pot holders, a matching dish towel and a pot scrapper in there).


Then just wrap it up and tie a pretty ribbon around the whole thing. A thoughtful, personalized gluten-free gift that the recipient is sure to enjoy ... or you could just give them a fruit cake.


Related Posts Plugin for WordPress, Blogger...

Lawyer-ish Stuff:

All content, photographs, and text provided on this site are the property of Shanghai Monkey, unless otherwise specified, and cannot be reproduced in any form without permission of the author. All content is intended for personal use only and cannot be reproduced for sale.


© 2019 Shanghai Monkey. All rights reserved.

ShareThis